
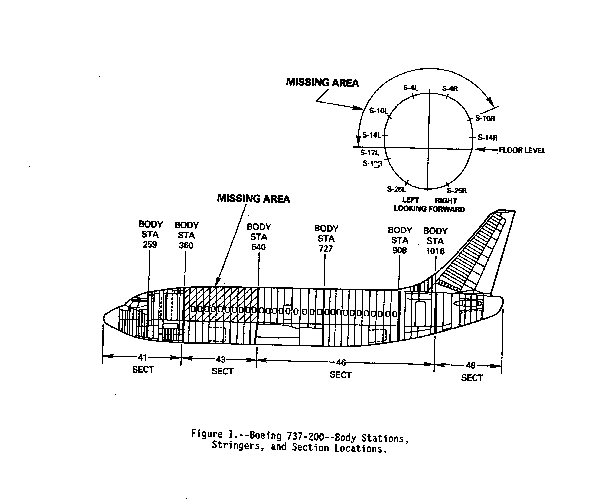
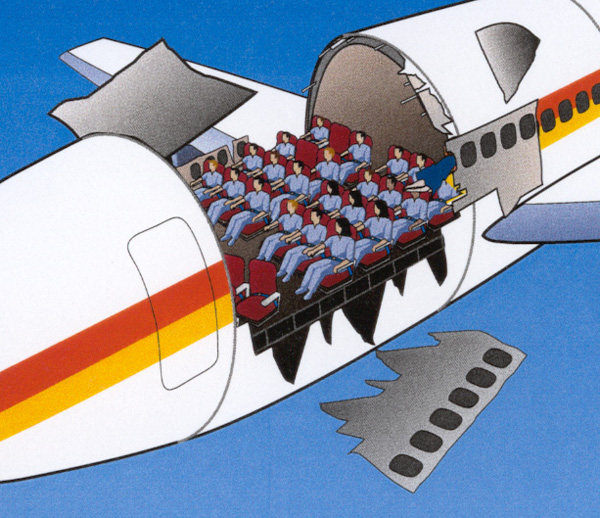
Flight 243 departed Hilo airport at 1:25pm. Departure and climb out were uneventful. As the aircraft reached its assigned altitude of 24,000 feet, the First Officer moved the controls to pitch the aircraft from climb to level flight. The failure occurred at this instant. The first graphic shows the aircraft at this instant in time.
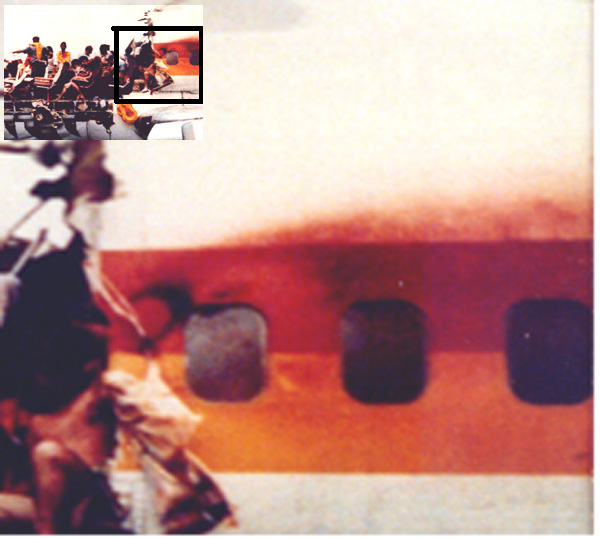
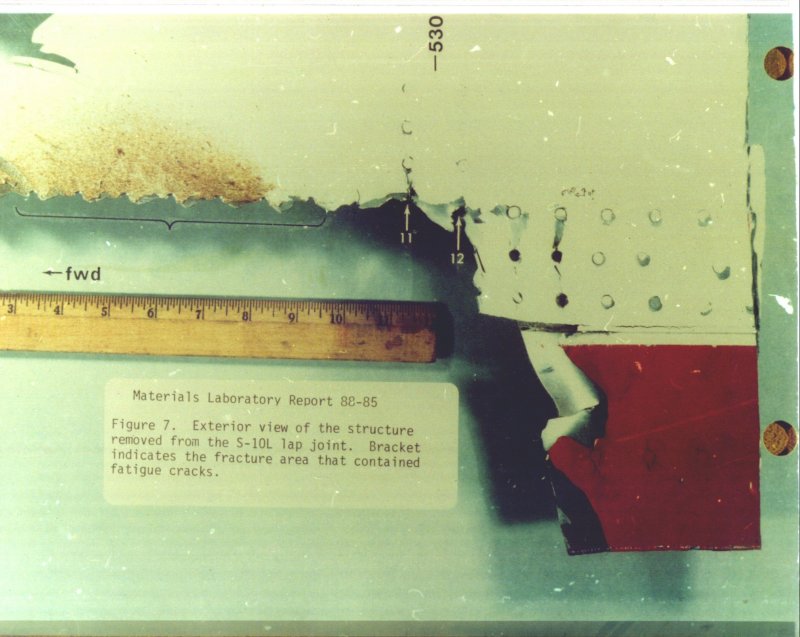
The fuselage (designed for 75,000 flight cycles but having been flown for 89,680 cycles) suffers from extensive Multiple Site Damage(MSD) which the NTSB determines as the probable cause of the accident. Multiple Site Damage(MSD) is defined as cracks extending on both sides of the rivet holes along the upper rivet row of the lap joints of the fuselage. Two other major fuselage failures exist on the upper row of rivets on the S10L lap joint. Near the forward entry door the Multiple Site Damage cracks have joined to form a single crack about 6-8 inches long. This crack was noticed by two passengers as they boarded the aircraft in Hilo. The crack was long enough and wide enough that the internal fiberglass insulation was being extruded from it. The passengers did not report the crack, feeling that if the aircraft was not safe, the airline would obviously not fly it.
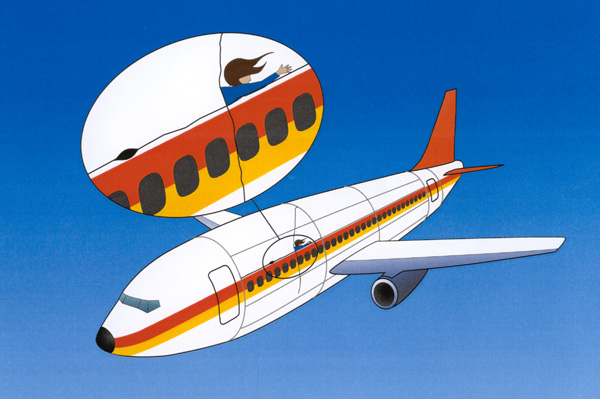
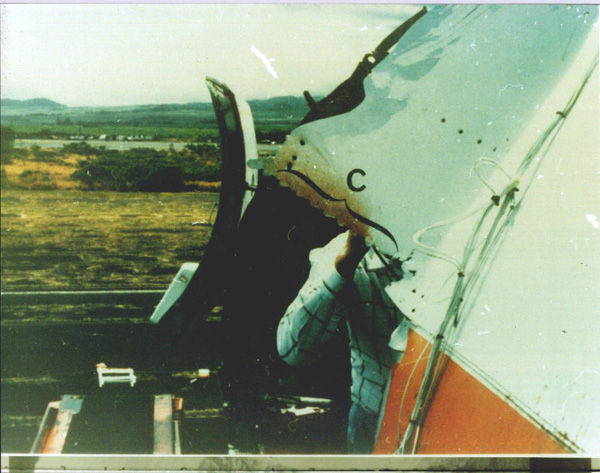
The focus of the NTSB hearings in Seattle was the failure of the Boeing 737 design to "Safely Decompress". Contrary to the NTSB findings, the fuselage did tear open a "Safe Decompression Flap" as designed. If the Flight Attendant had not been standing directly underneath the "Flap" when it occurred, the plane would probably not have suffered an explosive decompression.
The forces exerted on the fuselage by leveling of the aircraft was the proverbial straw that caused a link up of Multiple Site Damage cracks at BS500 (Row 5) which were arrested by the Safe Decompression design causing the "Flap" to open.
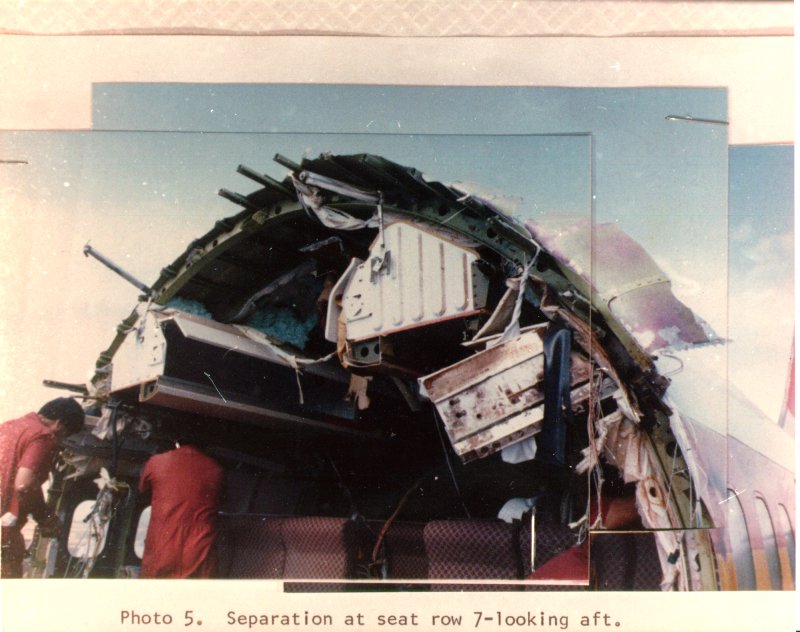
At the instant in time represented by the first graphic, the aircraft is in the process of rotating from climb to level flight, there is a tear in the S10L lap joint at BS360 and a Safe Decompression Flap at BS500.
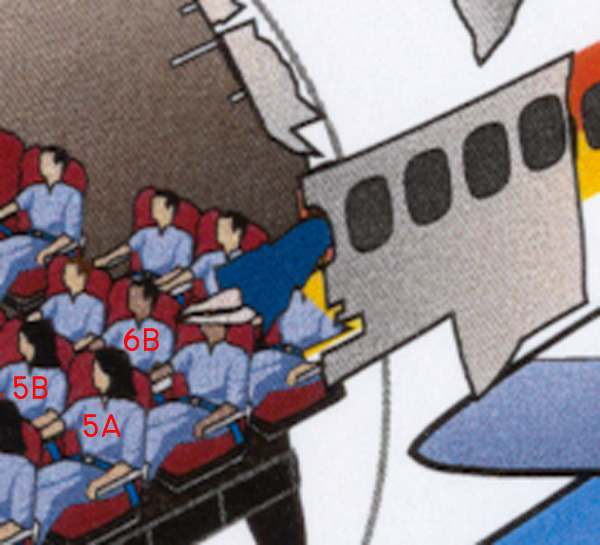
The cabin however was pressurized. With the approximately 10" x10" opening, the internal cabin air began to escape at over 700 mph. The Flight Attendant who was reaching to pick up a cup from Passenger 5B was immediately sucked into but not through the "Safe Decompression Flap". Only the Flight Attendant's right arm and head were forced through the opening. This effectively slammed the door shut on a 700 mph jet stream. The resultant reaction to corking a high velocity fluid flow is called a "Fluid Hammer". The attempt to stop the high velocity air flow causes a pressure spike of high value (hundreds of pounds per square inch) and short duration (only tens of thousandths of a second).
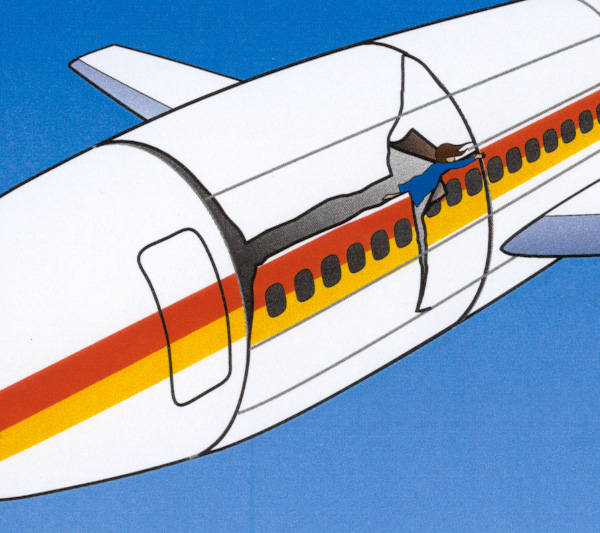
The fuselage integrity is severely degraded due to the Multiple Site Damage and its 0.036" (36 thousandths of an inch) pressure boundary wall thickness is only designed for about 8.5 psi normal operating pressure differential. The fuselage could barely contain the normal operating pressure and obviously not pressure spikes of a magnitude generated by a Fluid Hammer. The Fluid Hammer caused the fuselage skin to crack like an eggshell.
Any fluid flow always follows the path of least resistance. With the "Flap" at BS500 plugged and the fuselage skin between BS360 and BS500 completely severed, the internal cabin pressure begins to push outward on the fuselage skin, sensing the weakest point as halfway between BS360 and BS500. This location is BS440. This is the location identified by the NTSB as probable location of the "initial" failure.
[Editorial Comment: The only significant difference between the NTSB analysis and this analysis of the Flight 243 accident is the location of the initial failure point. This difference is 60 inches and approximately 20 thousandths of a second.]
For the next 0.6 seconds (6 tenths of a second) the aircraft is propelled nose down and to the right by the internal air escaping from the disintegrating fuselage centered about BS440 at the S10L lap joint. The Flight Attendant begins to slide toward the rear of the aircraft as the S10L lap joint separates.
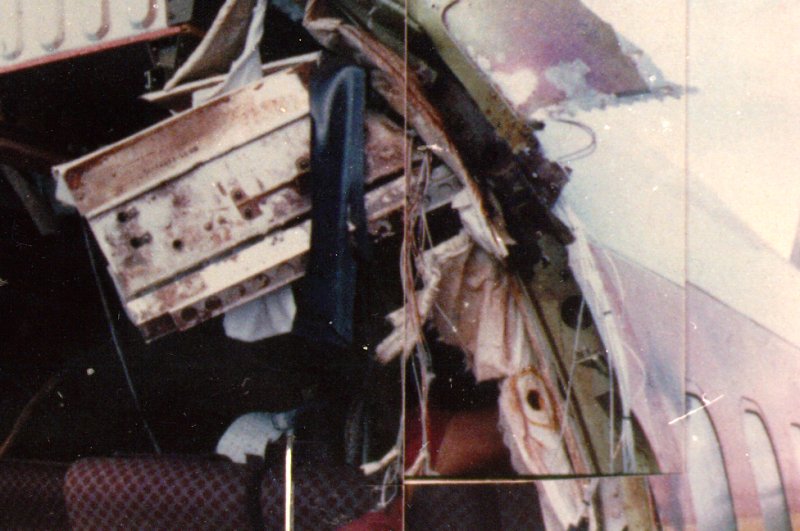
For the next 1.2 seconds the aircraft the moves up and to the left as sections of the fuselage continue to peel away. The section below S10L between BS360 and BS500 blows out and downward. The roof section blows up, tearing from the BS360 seam. At BS500 the roof crack angles diagonally back toward the top center line of the aircraft. Aft of BS500 along the S10L lap joint, above the joint a diagonal piece folds back over on itself. Below the joint, the window belt section tears in a backward direction. The Flight Attendant continues to slide rearward, trapped in the joint.
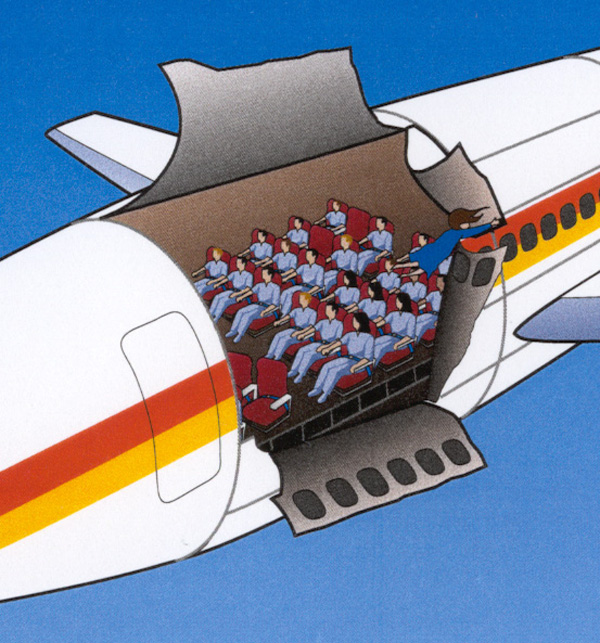
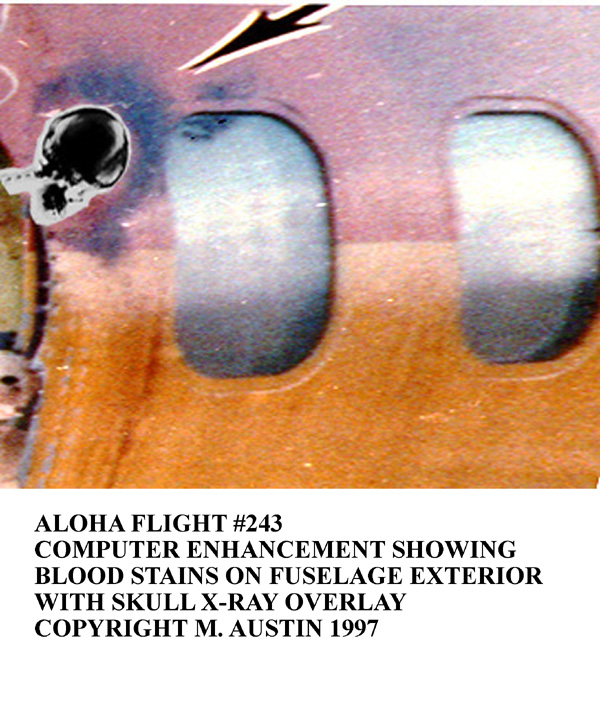
The window belt section aft of BS500 and below the S10L lap joint folds back over rearward. This pops out the window just forward of the BS540 seam and tears the fuselage from the window to the lap joint. This allows the Flight Attendant's head and body to drop approximately 1 foot just as the section slams against the exterior fuselage. This is the event that creates the telltale "Halo of Blood."
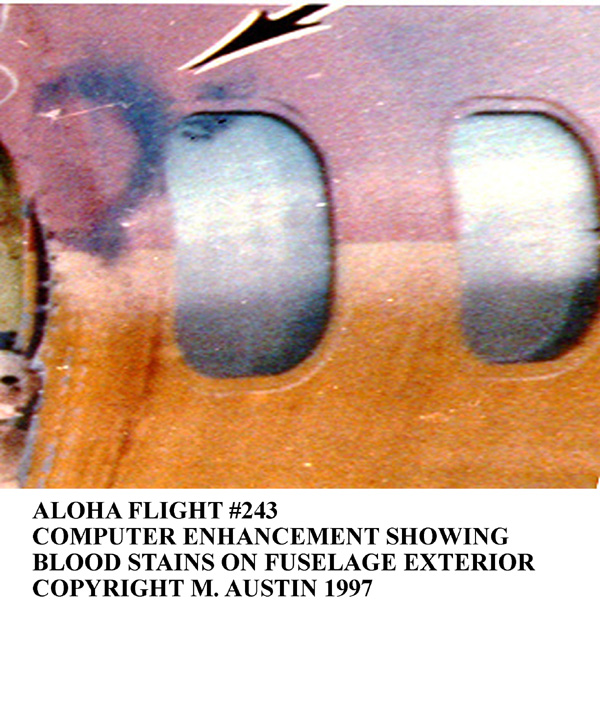
Evidence for path of the Flight Attendant is forensic. Extensive blood stains saturated Seat 5A. The clothes of Passenger 6B were "soaked with blood, which was not his. Because of the possible significance of this, arrangements were made to pick up his clothes for analysis..." - as recorded in the NTSB Passenger Interviews. [Note: No further reference to this is made in the entire NTSB docket.] Blood spatter existed on the interior of the remaining section of the S10L lap joint in a fore to aft direction. Blood spatter was in the opposite, aft to fore direction, on the exterior of the same piece.
